iOS (Apple)
Before creating the Certificate
You will need a Mac for the following steps
To create the iOS Certificate there are a few things that we need to do first. First you need to generate an App ID on iTunes Connect and the Apple Developer Portal.
- Copy the App Package ID that you have just entered above and open the Apple Developer Portal.
- Click on "Account" and login when prompted.
- On the page that opens click on Certificates, Identifiers & Profiles.
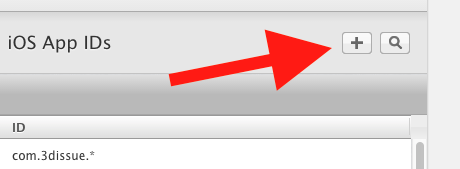
- In the panel on the left click App IDs under Identifiers
- Then click the + icon in the top right to add a new App ID.
- Proceed to fill in the requested details:
App ID Description
Name
This is the name you will use to identify your new identifier in your account. It doesn't need to match the name the app will have on the store as is just for internal use.
App ID Prefix
Value
Unless your app is going to be added to multiple teams, you should leave the default Team ID.
App ID Suffix
Select Explicit App ID
Bundle ID:
Paste in your App Package ID, that you entered in the 3D Issue submission page.
App Services
Enabled Services:
Keep the default options also selecting the following options:
- Push Notifications
Scroll to the bottom of the page and click Continue.
The next page to open allows you to review the information entered. To make the steps later easier I'd reccommend opening a text file on your computer and copying the "Identifier" value as it will be used later.
Click Done.
Go back to the 3D Issue Submission page
(Keeping the Apple developer center tab open)
Certificate
- Click "Create New"
- In the view that opens click "Create New CSR", This will cause a loader to appear.
- Once the loader dissappears click the "Download CSR" button. Save the downloaded file to the desktop of your Mac.
- Switch back to the Apple Developer website and this time select the All option under Certificates.
- Click the + in the top right corner to create a new Certificate.
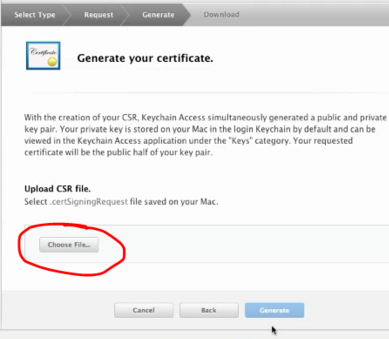
- Under Production select "App Store and Ad Hoc" and click "Continue" until you get to the page where it says "Generate your certificate".
- Click on "Choose file" under "Upload CSR file" and look for the CSR file that you previously downloaded from the dashboard.
- Now click "Generate", then "Download" Save the file to your desktop again.
- No go back to 3D Issue and click the uploaded button to the right of the certificate field.
Provisioning Profile
- For this we'll need to go back to the apple developer center once more.
- Click on All under Provisioning Profiles
- Now click the + icon in the top right corner to add a new Provisioning profile.
- Under Distribution Select App Store. Do not select tvOS App Store.
- On the next page Select the app id you created moments ago from the dropdown box. If this is a new account it will likely be the first option. Click Continue.
- On The next page select an Certificate that has (iOS Distribution) written beside it.
- Click Continue.
- On The next page, give your profile a name. This can be any name, I reccommend you name it similarly to your app's name.
- Click continue, then click Download. Save the file to your desktop.
- Now return to the 3D Issue submission page and click the upload button next to the Provisioning profiles text.
You are now almost ready to build your app for submission to the App Store and Google Play. Continue to the Google Services section before clicking the build build button
We're aware of the complexity involved with these steps. Please rest assured that we're working towards automating this process further. This documentation will be updated over time to reflect this.